Most bathtub recaulking jobs fail within six to twelve months. Not because the homeowner did something dramatically wrong, but because they skipped a step or two early in the process — usually around surface prep — and the new caulk never had a real chance to bond. The result is the same cracking and peeling they were trying to fix, except now there’s old caulk underneath new caulk and the whole thing is even messier to deal with.
This guide covers how to do it correctly from the beginning. That means removing every trace of the old caulk, cleaning the surface the way it actually needs to be cleaned, choosing the right product for a bathroom environment, and applying the bead in a way that doesn’t look amateurish. Done right, a bathtub caulking job should last five to ten years or more before needing attention again.
Over time, gaps between a bathtub and the surrounding walls become vulnerable points where water can seep through, leading to mold, mildew, and even structural damage that costs far more to repair than a simple recaulking job. Catching the problem early — when caulk first starts to crack, discolor, or pull away from the surface — is the difference between a two-hour weekend project and a tile replacement.
Signs Your Bathtub Caulk Needs to Be Replaced
You don’t need to wait until the caulk is falling off in pieces. Any of the following is enough reason to recaulk soon.
Check for cracks, brittleness, or discoloration — these are all signs of old, dried-out caulk that needs to be removed. If you notice mold or mildew growing on the caulk, this is a clear sign it needs to be replaced.
A gap opening between the caulk and the tub or wall is one of the clearest signals. Even a hairline gap allows water behind the wall with every shower. You might not see any damage for months, but the water is finding its way into the substrate behind the tile — and once mold establishes itself back there, recaulking the surface does nothing to address the root problem.
Pink or black discoloration that doesn’t come off with scrubbing is mold that has penetrated the caulk itself. At that point, cleaning products won’t fix it. The caulk needs to come out entirely.
Caulk that feels hard and brittle when you press on it has lost its flexibility and will crack under the normal movement that happens when a bathtub fills with water and the weight flexes the floor slightly. Flexible sealant is what keeps a tub joint intact. Brittle caulk is just waiting to crack.
What You’ll Need Before You Start
Getting everything together before you begin makes the job significantly smoother. This is especially important because once you start applying new caulk, you need to move at a consistent pace.
For removing old caulk:
- Utility knife or oscillating tool with a scraper attachment
- Plastic or metal putty knife
- Commercial caulk remover gel (optional, but helpful for silicone)
- Needle-nose pliers
- WD-40 or mineral spirits
- Diluted bleach solution (1 part bleach to 10 parts water) in a spray bottle
- Rubbing alcohol or isopropyl alcohol
- Clean dry rags and paper towels
For applying new caulk:
- 100% silicone caulk or siliconized hybrid caulk labeled for kitchen and bath use
- Caulking gun (for cartridge tubes — worth it over squeeze tubes for a tub job)
- Painter’s tape
- A small bowl of water and dish soap or isopropyl alcohol for smoothing
- Disposable gloves
- Paper towels
The caulking gun is worth buying if you don’t own one. For caulking a whole tub or shower, buy the rigid cartridge and a caulking gun. The gun provides a steady, continuous flow, which is essential for getting a smooth, professional-looking bead. This is non-negotiable for bathrooms. A basic gun costs $5 to $10 and makes the difference between a wobbly, uneven bead and one that looks professionally done.
Which Caulk to Buy
This decision gets more attention than it needs to from people overthinking it, and not enough attention from people who just grab whatever is on the end cap at the hardware store.
For a bathtub that sees regular daily use, the right answer for most homeowners is 100% silicone caulk labeled specifically for kitchen and bath. Silicone caulk is superior for wet bathroom areas like shower floors and tub surrounds because it’s 100% waterproof, extremely durable, and resistant to mold growth. It can last over 20 years in wet conditions.
Unlike latex options, silicone forms a watertight seal that won’t break down when regularly exposed to water. Silicone maintains remarkable elasticity throughout its lifespan, expanding and contracting up to 50% of its original size. This flexibility accommodates natural building shifts, temperature fluctuations, and vibrations without cracking or pulling away from surfaces.
The practical tradeoff is that silicone is harder to apply cleanly than latex, can’t be painted, and requires more careful surface prep to bond well. If you’re reasonably careful about prep and technique, it’s worth it for a tub that gets used daily.
While latex caulk offers a better look and lower cost than silicone, it has a major vulnerability — water. You should avoid using latex in bathrooms unless you’re willing to recaulk more frequently. Latex caulk also tends to shrink and expand when the surrounding air swings from warm to cool, making it vulnerable to cracking and shortening its lifespan.
Latex caulk is not truly waterproof — it is water-resistant. In a shower or tub combo that sees daily use, latex breaks down in 2 to 5 years as water slowly penetrates the cured bead.
The middle-ground option is a siliconized hybrid caulk. These combine silicone’s water resistance with acrylic’s easier workability. Hybrid formulas combine silicone polymers with acrylic technology to deliver easier application than pure silicone while maintaining strong water resistance. They are paintable, clean up with water before curing, resist mold, and maintain flexibility for years. DAP 3.0 Kitchen, Bath, and Plumbing Sealant is one of the most commonly recommended options in this category.
One specific thing to look for on the label regardless of type: make sure it says mold-resistant or contains antimicrobial protection. 100% silicone sealant that contains antimicrobial properties that inhibit the growth of mold and mildew is an excellent choice for bath applications.
Step-by-Step Guide to Recaulking a Bathtub
Step 1. Remove All the Old Caulk
This is where most DIY recaulking jobs go wrong. People apply new caulk over old caulk, or leave residue on the surface, and the new bead peels within months. New caulk won’t stick reliably to old caulk residue. Thorough removal is the difference between a long-lasting seal and a bead that peels.
Use a utility knife to score along both edges of the caulk bead where it meets the surface. Then slide a putty knife or razor scraper under the bead and work slowly to avoid scratching tubs, tile, fiberglass surrounds, or countertop finishes.
For silicone caulk specifically: try cutting into the center of the bead with a sharp utility knife, then grab the cut end with needle-nose pliers and attempt to pull the whole thing out in one piece. If it doesn’t come loose, work a razor blade under one edge, then another to sever its grip.
If the old caulk is stubborn, apply a commercial caulk remover gel and let it sit for the time listed on the label — usually 30 minutes to two hours. The gel softens the adhesive bond and makes scraping much easier without needing to dig hard and risk scratching the tub surface.
After the bulk of the old caulk is gone, inspect the seam carefully and remove every small piece you can find. Even tiny remnants create high spots that prevent the new bead from sitting flush and bonding completely.
Step 2. Clean the Surface Thoroughly
Old caulk removal exposes soap scum, hard water deposits, mold, and years of accumulated grime underneath. New caulk applied over any of that won’t bond properly — and mold left behind will grow back through the new bead within weeks.
Scrub the joint clean — first with WD-40 to dissolve silicone residue, then with a solution of diluted bleach and detergent to kill any mildew. Rinse thoroughly before drying.
Spray bleach or a disinfectant solution along the exposed seams where the old caulk was. This step helps kill any mold spores or bacteria hiding in the cracks, preventing future growth beneath the new caulk. Use a 1 to 10 bleach solution, let it sit for 15 to 20 minutes, then scrub with an old toothbrush and rinse with clean water.
Once the bleach rinse is done, wipe the entire seam down with isopropyl alcohol. Wipe the area down with isopropyl alcohol and let the surface dry completely before laying a new bead. Alcohol removes any remaining soap residue and oils that could interfere with adhesion, and it evaporates quickly.
This next point cannot be overstated: the surface must be completely dry before you apply caulk. Do not caulk over moisture. Trapped water leads to poor adhesion and mold behind the new bead. After cleaning, leave the bathroom with ventilation running for at least an hour — two hours is better. For a bathroom in humid climates, overnight drying before applying new caulk is worth the extra wait.
Step 3. Fill the Bathtub with Water Before Caulking
Most guides skip this step, and it’s one of the biggest reasons DIY caulk jobs crack relatively quickly.
A bathtub flexes when it’s filled with water and someone gets in. That flex is small but meaningful — the joint between the tub and the wall moves slightly as the tub carries load. If you apply caulk to a dry, empty tub, it cures in the position of least stress. Then when someone fills the tub, the joint opens slightly and immediately creates tension in the fresh bead.
Fill the tub completely with water before you caulk. Let it sit while you work. The tub is now in its loaded position — the same position it will be in when in use — and the caulk will cure at the right width and without stress. After the caulk cures, drain the tub. You’ll see the joint close slightly, compressing the bead rather than tensioning it. A compressed bead lasts significantly longer than a stretched one.
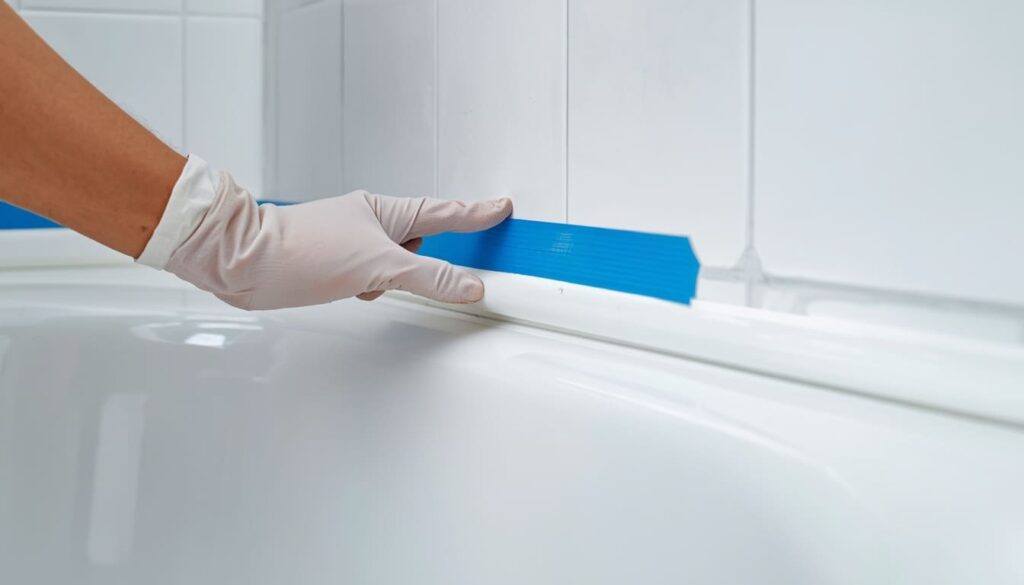
Step 4. Apply Painter’s Tape for Clean Lines
For a smoother bead and easier cleanup, apply painter’s tape on either side of the area you’re sealing. Run one strip along the tub surface parallel to the seam and one strip along the tile or wall, leaving just the seam gap exposed between them.
The gap between the tape lines should be slightly wider than the bead you plan to apply — typically about a quarter inch for a standard tub joint. Press the tape edges down firmly so no caulk bleeds underneath.
Don’t rush this step. Straight tape lines are the main thing that separates a finished caulk bead that looks professional from one that looks like it was applied in a hurry.
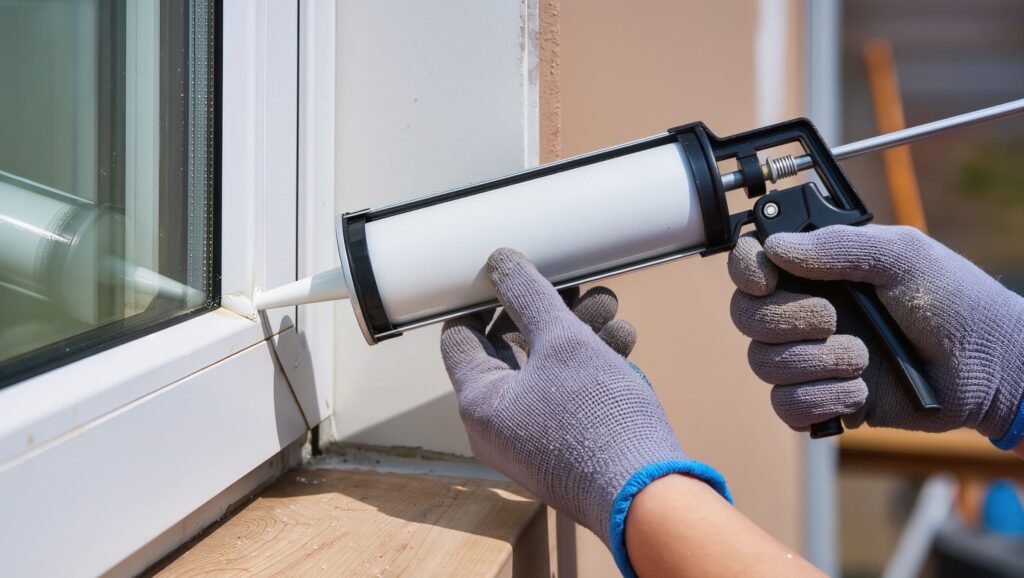
Step 5. Cut the Nozzle and Load the Caulk Gun
Cut the nozzle of the caulk tube at a 45-degree angle. Make sure the opening is small — about 3/16 inch in diameter. Pierce the inner seal of the tube using the wire tool on the caulk gun. Load the tube into the gun and apply slight pressure to the trigger to verify the caulk flows smoothly.
The 45-degree cut matters. It gives you a nozzle that can follow the seam at an angle while the bead fills the joint from the side rather than pressing straight down. The size of the opening should match the joint — too small and you won’t fill the gap in one pass, too large and you’ll have a messy overflowing bead that’s hard to smooth.
Test the flow on a piece of cardboard before touching the tub. This confirms the bead size, clears any blockage in the nozzle, and gives you a chance to get a feel for the trigger pressure before you’re working on the actual joint.
Step 6. Apply the Caulk in One Continuous Pass
For the cleanest seal, aim for one continuous pass per section. Use both hands with the caulking gun — dominant hand on the trigger, other hand guiding the nozzle.
Hold the gun at a consistent angle and move at a steady pace. Moving too slowly deposits too much caulk and creates a lumpy bead. Moving too fast leaves gaps and thin spots. The goal is a consistent tube of caulk that fills the joint completely and sits slightly proud of the surface so you have material to smooth into the gap.
Work in sections if the tub has multiple seams — one long side at a time rather than trying to caulk the entire tub perimeter in one pass. This lets you smooth each section before moving to the next without rushing.
If you stop mid-run and the caulk builds up at the point where you stopped, that spot will be thicker than the rest of the bead. Keep a steady pace through the full length of each section without stopping if possible.
Step 7. Smooth the Bead
Immediately after applying, use a damp paper towel or your finger (wearing a disposable glove) to gently press and smooth the caulk into the gap. Smoothing not only improves appearance but also ensures the caulk fully adheres to both surfaces. Wipe away any excess caulk with a clean section of the towel for a professional finish.
For silicone caulk, wet your finger with a small amount of dish soap and water. Soap prevents the silicone from sticking to your skin and allows you to run a smooth, controlled pass along the bead. A single, firm, continuous stroke gives the cleanest result. Going back over the same spot multiple times drags the caulk and creates an uneven surface.
For hybrid or siliconized latex caulk, a slightly damp finger without soap works fine since these products are water-based before curing.
Step 8. Remove the Tape and Let It Cure
Carefully peel off the painter’s tape before the caulk begins to skin over. Pull the tape away at a 45-degree angle for the cleanest line.
The timing here matters. Pull the tape too early and the caulk hasn’t skinned enough to hold a clean edge. Pull it too late and the tape tears through the surface of the curing bead. The right window is typically 5 to 15 minutes after application for most products — before the surface feels tacky but before it feels firm.
Allow the caulk to dry undisturbed for at least 24 hours, or as directed by the manufacturer. Avoid using the bathtub during this time to ensure a strong, watertight seal forms. Even if the surface appears dry after a few hours, curing happens internally and requires patience.
Silicone in particular looks and feels dry on the surface well before it’s fully cured through the depth of the bead. Using the tub too soon — especially filling it with water — stresses the bead before the adhesion has fully developed and is a common cause of premature failure.
Why Caulk Molds So Fast (and How to Slow It Down)
Mold on bathtub caulk isn’t inevitable — it’s a result of conditions that can be managed. Understanding what causes it is what lets you actually slow it down.
Bathtub silicone caulk contains chemicals to resist mold growth and does that pretty well. Unfortunately, if silicone is cleaned with products containing chlorine bleach, the bleach alters the surface of the caulk, making it much more attractive to mold. This means that the very product most people use to clean mold from caulk — bleach spray — can accelerate mold growth on silicone if used regularly as a cleaner. Use bleach for the initial sterilization before applying new caulk, then switch to a bathroom cleaner that doesn’t contain bleach for routine upkeep.
The bigger factor is moisture that sits on the caulk for extended periods. Mold needs moisture, soap residue, and time — which is exactly what a bathtub joint provides if the bathroom isn’t ventilated properly. Running the exhaust fan during and for at least 15 minutes after every shower removes a significant amount of the moisture that would otherwise sit on the caulk surface. If your bathroom lacks an exhaust fan or the fan is undersized, opening a window and wiping down the tub area with a dry towel after showering makes a meaningful difference.
Soap scum that accumulates in and around the caulk line provides organic material for mold to feed on. A quick weekly wipe-down of the tub joint with a bathroom cleaner keeps the buildup from establishing itself. Five minutes once a week is significantly less work than recaulking every two years.
Common Mistakes That Make Caulk Fail Early
Caulking over old caulk. The single most common reason a fresh caulk job fails quickly. New caulk won’t bond to old caulk residue, and any moisture or mold trapped underneath continues to grow and compromises the new bead from beneath.
Applying caulk to a damp surface. Even a surface that looks dry after cleaning may still hold moisture in small pores or in the grout. Waiting a full hour — or longer in humid climates — after cleaning before applying caulk is not excessive.
Not filling the tub with water before caulking. As covered in Step 3, caulking a dry empty tub means the bead cures under zero load and will experience tension every time the tub fills. Filling the tub first takes two minutes and extends the life of the bead significantly.
Using latex or acrylic caulk on a high-use tub. Avoid basic painters caulk (non-siliconized acrylic) for any bathtub application. It has zero mold resistance and deteriorates rapidly in standing water.
Applying too large a bead. A wide thick bead looks substantial but doesn’t bond better — it just has more surface area to collect mold and more volume to crack as it ages. A neat, correctly sized bead that fills the joint and sits flush with both surfaces outperforms a large messy one in every way.
How Often Should You Recaulk a Bathtub
With 100% silicone caulk applied correctly to a properly prepped surface, you can realistically expect five to ten years before the bead needs attention. Some homeowners get fifteen years or more in low-humidity environments with good ventilation and proper cleaning habits.
With a siliconized latex or hybrid product, plan for recaulking every three to five years depending on how much the bathroom is used.
The bathroom is one of the areas that comes up repeatedly in a solid home maintenance checklist for every season — and caulk inspection should be a consistent part of that routine. Checking the tub joint once a year takes sixty seconds. Catching a crack or gap early means a quick touch-up rather than a full removal and redo.
The EPA’s guidance on household mold is worth reading if you’ve had recurring mold issues in your bathroom — it explains how moisture conditions lead to mold growth and what’s needed to actually prevent it rather than just clean it off the surface. And for a broader understanding of how caulking and sealants work chemically and structurally, the Wikipedia article on caulk covers the material science behind why different formulations behave differently in wet environments.
FAQ
How long does bathtub caulk take to dry before I can use the shower?
Allow the caulk to dry undisturbed for at least 24 hours, or as directed by the manufacturer. Even if the surface appears dry after a few hours, curing happens internally and requires patience. For 100% silicone products specifically, 24 hours is the minimum before water contact — and 48 hours is safer if you live in a humid environment where silicone cures more slowly.
Can I caulk over existing caulk if it’s only cracked in one spot?
For a small isolated crack, applying a thin bead of the same caulk type over the crack is a reasonable short-term fix. Clean and dry the area thoroughly first. But this is a patch, not a permanent repair. If the existing caulk is more than five years old or showing mold in multiple spots, removing everything and starting fresh gives a far better and longer-lasting result than patching over deteriorating caulk.
What’s the best way to remove old silicone caulk without scratching the tub?
Use a plastic scraper or the back edge of a plastic putty knife rather than metal tools against fiberglass or acrylic tub surfaces. Score along the edges with a utility knife first to release the bond, then work the plastic scraper underneath and peel the bead away. A commercial caulk remover gel applied and left for 30 to 60 minutes makes the silicone significantly easier to peel without needing aggressive scraping.
The mold keeps coming back within a few months of recaulking. What am I doing wrong?
This almost always points to one of two things: either mold wasn’t fully eliminated from the surface before the new caulk went on, or the bathroom isn’t ventilating well enough during and after showers. For the first issue, extend the bleach treatment time to 20 minutes and let the surface dry completely for several hours before applying new caulk. For the second issue, run the exhaust fan for at least 15 to 20 minutes after every shower, and consider wiping down the tub surround with a dry towel to remove surface moisture.
Does the color of caulk matter beyond appearance?
Only in that darker colors (gray, beige) tend to hide soap scum buildup and minor discoloration better than white, meaning they look cleaner for longer between cleanings. White caulk is the most common and matches most tubs and tiles, but it shows water spots and buildup more readily. The material performance is identical regardless of color.
My caulk is peeling away from the wall but still attached to the tub. Can I just reattach it?
No. Once a caulk bead loses adhesion on one side, the seal is broken and water has been getting behind it. The bead needs to come out entirely. Trying to press it back and reseal it won’t work — the surface under the peeled edge has already accumulated moisture and likely some mold, and the caulk won’t re-bond to a compromised surface. Remove it, clean thoroughly, let it dry, and apply a fresh bead.
Is there a caulk that truly never molds?
Nothing is completely immune, but 100% silicone caulk with built-in antimicrobial additives comes closest. Silicone caulk contains built-in biocides that actively resist mold and mildew growth in high-humidity environments. Combined with good bathroom ventilation and regular cleaning with a non-bleach bathroom cleaner, a quality silicone bead can stay clean-looking for several years without visible mold growth.