Building a raised garden bed is one of the most satisfying DIY projects you can do around the house. It takes one weekend, costs between $100 and $200 in materials, and you end up with something you’ll actually use for years. No advanced woodworking skills needed — if you can drive a screw and cut a board, you can build this.
Raised beds give you full control over your soil, make it easier on your back and knees, and let you grow more food in a smaller space than traditional in-ground gardening. They also look clean and intentional in a yard, even when you’re just starting out.
This guide covers everything from picking the right wood and choosing a location, to cutting the boards, assembling the frame, and filling it with the right soil. By the end of Saturday, you’ll have something to plant in.
Why Raised Garden Beds Work So Well
Before getting into the build, it’s worth knowing why so many gardeners go this route.
You can fill a raised bed with top-quality soil for more productivity in a smaller space. Raised beds also limit creeping weeds and drifting seeds from the surrounding yard.
In-ground gardens are at the mercy of whatever soil you happen to have. That might be heavy clay, nutrient-poor sand, or ground that holds water and drowns roots. With a raised bed, you start from scratch with exactly the soil mix your plants need.
Better drainage prevents root rot and waterlogging. Because the bed sits above grade, water moves through the soil and out the bottom rather than pooling around roots. In areas with heavy rain or naturally poor drainage, this alone makes a significant difference in what you can grow.
The other advantage is ergonomics. A raised bed 12 inches tall means less bending. A bed 24 inches tall is almost entirely knee-friendly. If back pain has kept you from gardening before, the right bed height changes that completely.
Choosing the Right Location
Pick your spot before you buy any lumber. Once the bed is built and filled with soil, moving it isn’t a realistic option.
Sunlight is the most important factor. Most vegetables need six to eight hours of full sunlight per day, so choose a spot that maximizes sun exposure. Walk the yard at different times of day and notice which areas stay sunny. The south-facing side of the yard is usually your best bet in most of the US.
Placing the bed near a hedge is good for airflow, but make sure there are no overhanging tree branches that will stop rainwater from reaching the bed. Tree roots are another thing to think about — aggressive root systems from nearby trees can eventually find their way into the bed from below.
Level ground makes assembly easier and the bed more stable. If your yard has a slope, you have two options: dig into the high side to level it out, or build one side of the frame taller to compensate. Either works, but leveling the ground first is simpler.
Think about water access too. A bed placed 200 feet from your nearest outdoor spigot is a bed you’ll end up under-watering. Keep it close to a hose connection.
What Size to Build
The most common size for a first raised bed is 4 feet wide by 8 feet long. Four feet wide is the ideal measurement because it allows you to reach the center from either side without stepping into the bed. Stepping on the soil compacts it, which defeats much of the purpose of building a raised bed in the first place.
You can make it longer than 8 feet, but be aware that longer boards sag and bow outward under soil pressure unless you add a center support stake. If you want more growing space, building two 4×8 beds with a path between them is easier to manage than one very long one.
For depth, 12 inches is the sweet spot for most vegetables. Six inches of soil should be the minimum for a raised garden bed. Generally, most garden plants require at least six to twelve inches for their roots, so twelve inches is ideal.
In beds 12 to 15 inches deep, you can grow cherry tomatoes, basil, lettuce, bush beans, sweet and hot peppers, radishes, green onions, and many types of herbs. If you want to grow deep-rooted crops like carrots, parsnips, or large tomato plants, 18 inches gives them more room to work with.
The Best Wood to Use
This decision matters more than most people realize. The wrong wood rots within two or three years, leaves you rebuilding sooner than expected, and can leach unwanted chemicals into your soil if you’re growing food.
For most home gardeners, cedar is the best all-around wood choice for raised beds because it’s naturally rot-resistant, stable outdoors, and comfortable for roots in the sun without needing heavy chemical preservatives.
Cedar is naturally resistant to rot and pests because of tannins in the wood. You can expect to garden in a cedar raised bed for at least 10 years before it starts to degrade. The downside is cost — cedar has gotten more expensive over the last few years. A 4×8 bed built from cedar boards will run $80 to $150 in lumber alone, depending on your area and lumber prices at the time.
If you want something more affordable, pine or Douglas fir are good budget-friendly alternatives, though they typically last fewer years unless sealed. Pine in ground contact usually lasts three to five years. You can extend that by painting the exterior with an exterior wood sealer — just keep the interior surface uncoated if you’re growing food.
What to avoid: The USDA’s organic regulations state that pressure-treated wood should not be used if the lumber will be in contact with crops, soil, or livestock. Old railroad ties are also a no — they’re treated with creosote, which you don’t want near anything you’re eating. Standard green pressure-treated lumber is also worth skipping for food beds regardless of what the label says.
For most first-time builders in most climates, the practical recommendation is this: if your budget allows, go cedar. If you want to try raised bed gardening without spending much, use untreated pine, seal the outside, and plan to rebuild in a few years once you’re committed to the hobby.
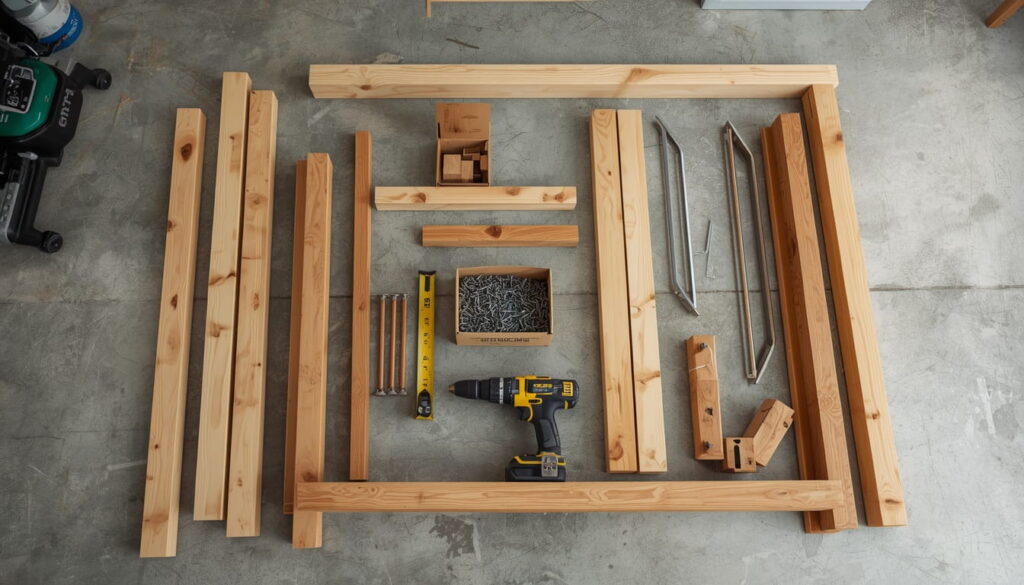
Materials and Tools
This list is for a standard 4 feet wide by 8 feet long by 12 inches deep raised bed.
Lumber:
Six 2x6x8-foot cedar or redwood boards (untreated) and four 4x4x12-inch cedar or redwood posts for corners.
Two 2×6 boards will stack to make your 12-inch height. The 4×4 corner posts hold everything together and anchor the frame.
Hardware:
- 2-inch and 3-inch exterior-grade deck screws (coated or stainless steel — standard zinc screws rust within a season)
- 8 L-brackets or corner brackets rated for outdoor use
- Landscape fabric or hardware cloth for the bottom (more on this below)
- Staple gun and staples
Tools:
- Circular saw or miter saw (most lumber yards will cut boards to length for free or a small fee if you don’t own a saw)
- Drill with Phillips head bit
- Tape measure
- Speed square
- Level
- Pencil
Total cost for a standard 4×8 cedar bed including all hardware: roughly $100 to $200 depending on current lumber prices and your location.
How to Build a Raised Garden Bed Step by Step
Step 1. Cut Your Boards to Length
If you’re building a 4×8 bed, your cuts are straightforward:
- Two boards at 8 feet (the long sides — these are already the right length if you bought 8-foot boards)
- Four boards at 45 inches (the short sides — this accounts for the 1.5-inch thickness of each long side board)
You’ll need two boards per side to reach 12 inches of height, so that’s four 8-foot pieces and four 45-inch pieces total.
While 1-inch boards might be cheaper upfront, they are prone to bowing under the weight of wet soil. Using 2-inch lumber ensures your raised beds stay straight and structural for years.
If you don’t have a saw, most Home Depot and Lowe’s locations will make straight cuts for a small fee. Give them your cut list when you buy the lumber and come home with everything ready to assemble.
Step 2. Prep and Mark the Corner Posts
Cut your 4×4 posts to 12 inches each — one for every corner. These will sit inside the corners of the frame, giving you something solid to drive screws into and keeping the corners square.
Mark each post at the 6-inch point. This is where the seam between your two stacked boards will land, and having a visual reference keeps everything aligned during assembly.
If you want the bed to be taller than the boards — say, to help anchor it into soft ground — cut the posts a few inches longer and let them extend into the soil.
Step 3. Assemble the Short End Panels First
Stand two of your 45-inch boards on edge and clamp a corner post at each end. The post sits flush with the ends of the boards, inside the frame. Drive two or three deck screws through each board into the post — pre-drilling pilot holes prevents splitting, especially near the ends of boards.
Repeat for the other short end.
You should now have two rectangular end panels that each look like a ladder on its side.
Step 4. Connect the Long Side Boards
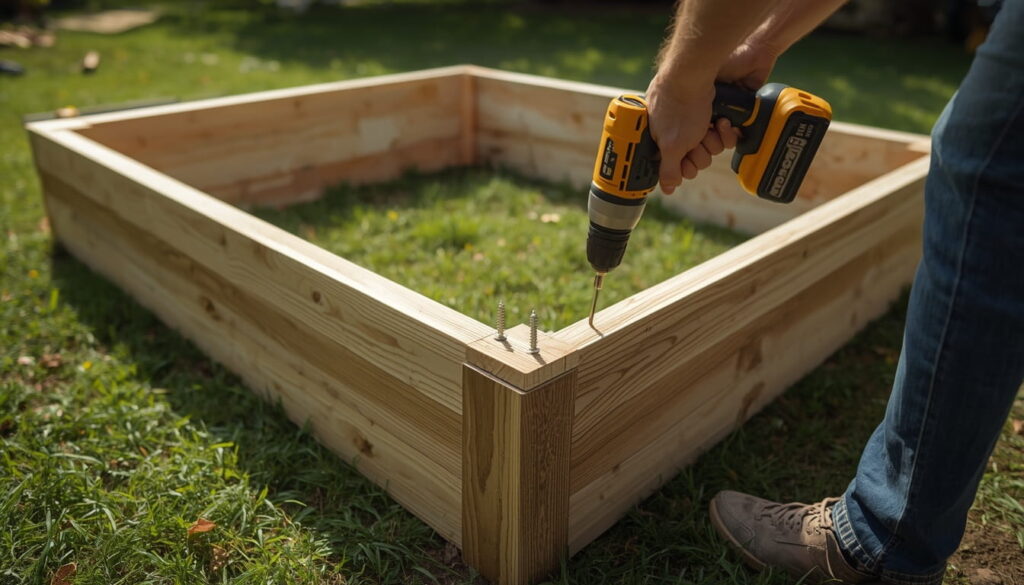
Stand your end panels upright and position them the right distance apart — 8 feet between them for a standard bed. Have someone hold an end panel in place while you drive the 8-foot long boards into the corner posts. Screws go through the long boards into the face of the corner post, two screws per board per corner.
Work your way around: bottom board on all four sides first, then top board. This keeps the frame square as you go rather than locking in a twist.
Step 5. Check for Square and Add Corner Brackets
Once all boards are attached, measure diagonally from corner to corner in both directions. If both measurements match, the frame is square. If they don’t, apply gentle pressure to the longer diagonal until they match, then add your corner brackets.
Corner brackets provide strong, stable support for connecting the sides of the raised bed, ensuring it holds up against soil pressure and weather over time.
Add an L-bracket at the top and bottom of each corner on the inside of the frame. These are what prevent the corners from pushing apart once the bed is full of wet soil.
For beds longer than 8 feet, add a center support on each long side — a short stake driven into the ground and screwed to the middle of the board from the outside. Without this, long boards bow outward under soil pressure within a season.
Step 6. Line the Bottom
Line the bottom of the bed with hardware cloth or landscape fabric. Landscape fabric creates a barrier between the soil you add and the ground below.
Hardware cloth (a rigid wire mesh with small openings) is worth using if you have gophers, voles, or other burrowing pests in your area. Staple it to the inside bottom edges of the frame before placing the bed.
If you’re building on concrete or a patio, skip the hardware cloth and use landscape fabric — just make sure there are gaps or the fabric is permeable enough to allow drainage.
If you’re placing the bed over grass, you can lay cardboard directly on the grass before filling. The cardboard smothers the grass and breaks down into the soil over the course of the season.
Step 7. Set the Bed in Place and Level It
Carry the frame to your chosen location. Set it down and use a level on all four sides. For a ground-level discrepancy of less than an inch, you can pack soil under the low side. For bigger differences, dig down the high side.
You can also elevate the corners slightly on a layer of gravel to prevent the bottom boards from sitting directly in wet soil. This extends the life of the wood considerably.
Once it’s level, drive two or three stakes into the ground through the inside of the frame at each corner to anchor it. This keeps it from shifting or getting knocked out of place.
What to Fill Your Raised Bed With
This part matters as much as the build itself. A perfectly constructed frame filled with bad soil will underperform a wobbly bed filled with good soil.
Use a mix of topsoil, compost, and organic matter. Do not use pure potting soil, which is too light for raised beds and dries out too fast.
The most commonly recommended ratio is sometimes called the “Mel’s Mix” from the square-foot gardening method: one third compost, one third peat moss or coconut coir, and one third coarse vermiculite or perlite. This combination holds moisture while draining well and provides a loose texture that roots move through easily.
If that formula feels complicated or expensive for a first bed, a practical starting point is to fill the bottom third with a mix of compost and native soil, then top it with a 50/50 blend of quality bagged topsoil and compost. This is less precise but works well for most vegetables.
How much soil do you need?
For a 4×8 bed at 12 inches deep, you need 32 cubic feet of soil. That’s roughly 20 to 25 bags of typical 1.5-cubic-foot bagged soil. Buying in bulk from a local nursery or landscaping supplier is significantly cheaper — usually $30 to $60 per cubic yard delivered, versus $6 to $10 per bag at a hardware store.
Put organic materials like compost, grass clippings, and leaves at the bottom of the garden bed. This boosts your soil’s health and benefits your plants. Avoid putting rocks on the bottom — they can create a perched water table within the raised bed, causing root rot and improper drainage.
Once the bed is full, water it thoroughly and let it settle for a day before planting. The soil level will drop a couple of inches and you may need to add a little more before your first season.
How to Make Your Bed Last Longer
A cedar bed will last 10 to 15 years with no treatment at all. Pine will last 3 to 5 years. A few simple steps extend either significantly.
Keep the outside of the boards sealed. Apply a food-safe exterior wood sealer to the outside surfaces. This slows moisture absorption while protecting the wood from rot without introducing chemicals near your soil. Reapply every two to three years. Never seal the interior surfaces of a food garden bed.
Optionally, line the interior walls with breathable landscape fabric stapled to the inside of the boards. This slows moisture from being in constant contact with the wood while still permitting airflow and root penetration.
At the end of each growing season, top the bed off with an inch or two of fresh compost. This replenishes nutrients that plants pulled from the soil during the growing season and keeps the soil biology active over winter.
FAQ
What is the best wood for a raised garden bed?
The best overall wood for raised beds is untreated cedar. It’s naturally rot-resistant, safe for growing food, and can last 15 to 20 years without chemical treatment. If you want something more affordable, pine or Douglas fir are good budget-friendly alternatives, though they typically last fewer years unless sealed.
How deep should a raised garden bed be?
Six inches of soil should be the minimum for a raised garden bed. Generally, most garden plants require at least six to twelve inches for their roots, so twelve inches is ideal. If you’re growing deep-rooted crops like carrots or parsnips, going to 18 inches gives them more room and reduces the need to loosen the soil underneath the bed.
Can I build a raised garden bed on concrete or a patio?
Yes. On a hard surface, use landscape fabric at the bottom instead of hardware cloth, and make the bed at least 12 inches deep since roots can’t draw from the ground below. Drainage becomes more important on a hard surface, so make sure the soil mix is loose and well-aerated rather than heavy.
Do I need to treat the wood before using it?
You don’t need to treat the interior surfaces, and doing so near food plants isn’t recommended. For the exterior, a coat of food-safe outdoor wood sealer applied before assembly will extend the life of the wood noticeably. Cedar doesn’t need it to last, but it will slow the natural weathering process.
How do I keep weeds from growing up through the bed?
Landscape fabric creates a weed barrier between the soil you add and the ground below while still allowing water and nutrients to reach plant roots. Cardboard also works well and breaks down into organic matter over time. Neither is a permanent solution — weed seeds will blow in from above eventually — but blocking the base prevents perennial weeds from pushing up through the bed from the root systems below.
What vegetables grow best in a raised bed?
Almost everything does well in a raised bed, but the ones that benefit most are those that struggle in poor or heavy native soil. Tomatoes, peppers, cucumbers, lettuce, greens, herbs, radishes, green beans, and most root vegetables all perform noticeably better in the loose, nutrient-rich soil of a raised bed compared to typical in-ground planting.
How much does it cost to build a raised garden bed?
The average cost per raised bed ranges from $100 to $300, including lumber, screws, and hardware. Cedar is at the higher end of that range, pine at the lower end. Soil is usually the largest hidden cost — filling a 4×8 bed 12 inches deep requires around 30 to 35 cubic feet of material, which can run $50 to $150 depending on whether you buy bagged or in bulk.
Do I need to remove the grass before placing a raised bed?
You don’t have to. Placing the frame over existing grass and laying cardboard inside before filling with soil is a common method. The cardboard blocks light and smothers the grass, which breaks down over the season. If you have aggressive perennial weeds like Bermuda grass or bindweed in your yard, removing them before building is worth the extra effort — they will push through cardboard eventually.