Replacing a light switch is one of the most beginner-friendly electrical repairs a homeowner can do. The job takes about 20 to 30 minutes, the replacement switch costs $3 to $10, and the steps are the same whether your switch is 5 years old or 40. The key is following the right order of operations — and the most important step happens before you touch a single screw.
This guide walks you through replacing a standard single-pole light switch (the most common type in American homes), explains what to do if you open the box and something doesn’t look right, and tells you clearly when to call a licensed electrician instead.
Before You Start — Know What Kind of Switch You Have
Not all light switches are the same, and replacing the wrong type with the wrong replacement leads to a switch that doesn’t work — or worse, one that’s wired incorrectly.
Single-pole switches are the most common type found in homes. They control a light or fixture from a single location and have two brass terminal screws for the hot wires, plus a green screw for the ground wire. Single-pole switches have ON and OFF labels printed on the toggle. If your switch has those labels, you have a single-pole switch and this guide covers your situation completely.
Three-way switches are used in situations where you want to control a single light from two different locations — perfect for staircases or long hallways. These switches do not have ON and OFF markings, because either switch can change the light’s state regardless of position.
If you have two switches controlling the same light from different spots — a common setup at the top and bottom of a staircase — you have a three-way switch configuration. Replacing a three-way switch follows a different wiring pattern and is beyond this guide. The basic safety steps and tools are the same, but the wiring connections differ, and getting them wrong means the light won’t work from one of the switches. If you’re dealing with a three-way switch, it’s worth having an electrician handle it or researching that specific configuration separately before starting.
For everything else — a single light, controlled from one switch, in one location — read on.
Signs Your Light Switch Needs Replacing
A switch doesn’t need to be completely dead to need replacement. When a light switch wears out from frequent use, it may make a buzzing sound, crackle when flipped, spark when touched, or simply fail to work properly.
Any of those behaviors is a clear signal to replace it. A switch that sparks or crackles is not something to keep using — the internal contacts are worn and can cause arcing inside the box. A switch that feels warm to the touch is equally worth replacing soon.
Before assuming the switch is the problem, though, rule out the light fixture itself. If a switch doesn’t work, first make sure the problem is with the switch and not the light or device it’s supposed to power. Put a new bulb into the light fixture or plug a working lamp into the switch-controlled outlet to make sure the switch is actually faulty.
Tools and Materials
You won’t need much. Here’s what to have ready before you start:
- Flathead and Phillips screwdrivers
- Non-contact voltage tester (costs about $15 at any hardware store — this is the most important tool on the list)
- Needle-nose pliers
- Electrical tape
- Replacement light switch (match the amperage and voltage rating on the back of the old switch — most residential switches are 15A, 120V)
- Replacement cover plate (optional, but a fresh plate looks much better)
When you replace a switch, make sure you check the amp and voltage ratings on the back of the old switch. The new light switch should have the same ratings.
A non-contact voltage tester is not optional. It’s a small pen-shaped tool that beeps or lights up when it detects electrical current without you touching anything. It’s the only reliable way to confirm that the power is actually off before you put your hands in the box.
Understanding the Wires
Opening an electrical box for the first time can look confusing. A quick overview of what you’re looking at makes the job much less intimidating.
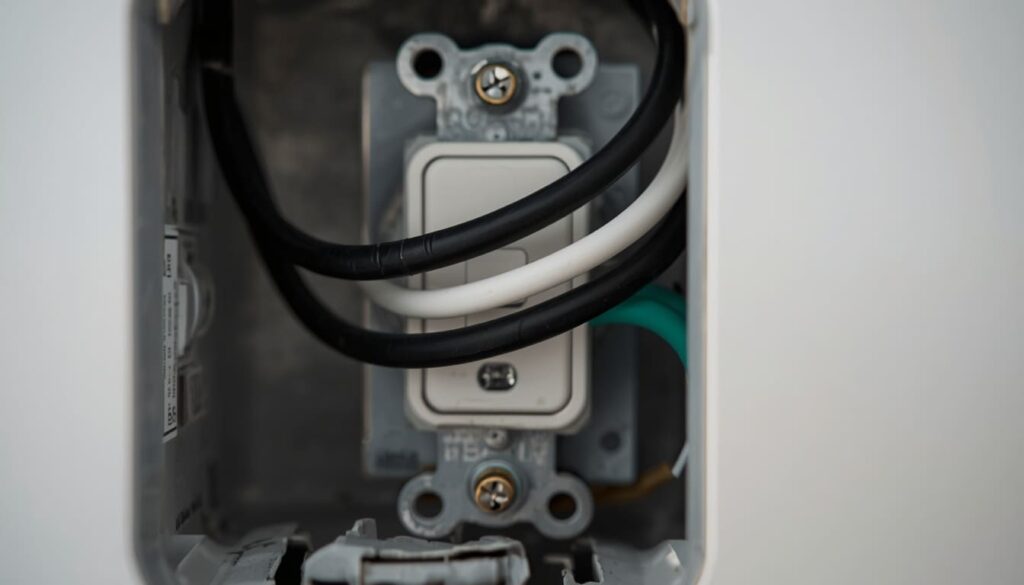
In standard residential wiring, black wires carry the current — they’re hot. White wires provide the return path — they’re neutral. Green or bare copper wires are the safety pathway — they’re ground.
For a standard single-pole switch, you’ll typically see two or three wires connected directly to the switch:
The black wire is the hot wire. It connects to one of the two brass-colored terminal screws on the sides of the switch.
The white wire on a switch leg is often used as a second hot wire, not as a neutral. You may find a white wire that has black tape on it connected to the switch. This tape indicates that the white wire is being used as a hot wire in the switch leg, not as a neutral. If you see a white wire on your switch with black tape or black markings, treat it the same as the black wire.
The bare copper or green wire is the ground. The ground wire is a critical safety conductor that prevents shock. It connects to the green ground screw on the switch.
There may also be other wires in the box that are bundled together with a wire nut and not connected to the switch itself — leave those completely alone. You’re only working with the wires that attach directly to the switch.
How to Replace a Light Switch — Step by Step
Step 1. Turn Off the Power at the Breaker
Go to your electrical panel and turn off the breaker that controls the room or circuit with the switch. Shut off the power to the circuit — never work on an energized circuit.
Don’t assume the switch is on its own breaker. In many homes, a single breaker covers multiple rooms or a combination of outlets and lights. If your panel labels are vague or incorrect, flip off the breaker you think controls the area and then test every light and outlet in that zone before proceeding.
After flipping the breaker, go back to the switch and flip it a few times. If the light was on, confirm it’s now off. This is a basic check — the real confirmation comes in the next step.
Step 2. Test the Switch with a Voltage Tester
This is the most important step in the entire process. Do not skip it.
Remove the cover plate by unscrewing the center screw. Set it aside. Now hold your non-contact voltage tester near the switch body before touching anything else. The tester beeps or lights up if it detects live current.
Confirm that the power is off by testing the switch with a voltage tester before touching any wires.
If the tester signals that power is still present, stop. Go back to the panel and find the correct breaker. In older homes, circuit labels are often wrong or absent. Try flipping off the main breaker as a last resort if you can’t identify which individual breaker controls the circuit.
Once the tester confirms no power is present, you’re safe to proceed.
Step 3. Remove the Old Switch
Unscrew the two mounting screws that hold the switch to the electrical box — one at the top and one at the bottom. Pull the switch straight out from the wall, leaving the wires attached. Gently pull the switch outward to reveal the wires that are attached to it.
Before disconnecting anything, take a photo with your phone. A clear photo of the current wiring configuration is your reference if you need to double-check anything during reassembly.
Before disconnecting any wires, take a picture of the current wiring setup to use as reference. Make a note of which wire connects to each screw — black (hot), white (neutral), and green or bare copper (ground).
Now disconnect the wires. Most switches use one of two methods:
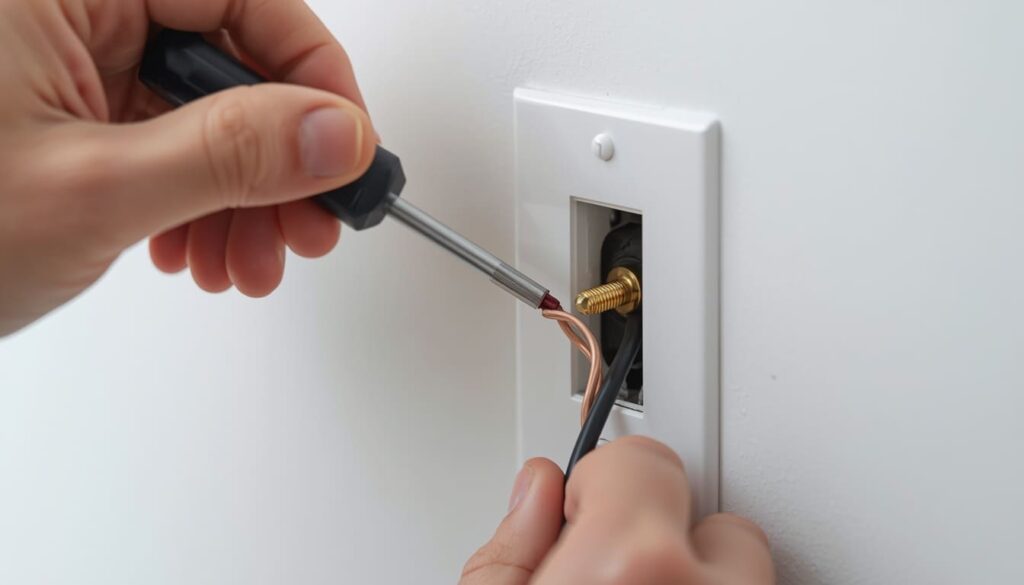
If the wires wrap around the terminal screws, loosen each screw counterclockwise until the wire slides free. If the switch uses backstab connectors — holes in the back of the switch body where the wire pushes in — insert the flat blade of a small screwdriver into the slot beneath the hole and push in while pulling the wire out.
Once disconnected, inspect the wire ends. They should have about half an inch of bare copper exposed. If the insulation is damaged, discolored, or the wire looks corroded, clip the end back with wire cutters and use a wire stripper to expose a fresh half inch of copper.
Step 4. Connect the Wires to the New Switch
This is where many first-timers make mistakes. Go slowly and confirm each connection before moving on.
Attach the wires to the corresponding terminals on the new switch — black (hot) wires attach to brass screws, white (neutral or switch-leg) wires attach to the appropriate screw per your reference photo, and green or bare copper (ground) wires attach to the green screw.
If you’re connecting wires to terminal screws rather than backstab connectors, the direction of the loop matters. When wrapping wires around terminal screws, always wrap the wire clockwise. Wrapping counterclockwise is a common DIY mistake — when you tighten the screw, it pushes the wire out instead of drawing it snug. Wrapping clockwise ensures the screw tightens the wire securely around it.
Tighten each screw until snug. The wire should not move when you tug on it gently. A loose connection is a fire hazard — it creates resistance and heat at the terminal over time.
For backstab connectors on new switches, push each wire firmly into the appropriate hole until it seats and doesn’t pull out. That said, terminal screws are the more reliable connection method. If your new switch gives you the option, use the screws.
Step 5. Mount the Switch and Test It
Before closing everything up, test the connection with your voltage tester one more time with the new switch installed. This confirms the wiring looks correct and nothing is touching that shouldn’t be.
Carefully tuck the wires back into the electrical box. Push the switch into place and secure it with the mounting screws. Reattach the cover plate.
Go to the electrical panel and turn the breaker back on. Now test the switch by flipping it on and off several times. If the light responds correctly and the switch feels normal — no buzzing, no warmth, no sparking — the job is done.
If the switch doesn’t function after installation, double-check that you’ve turned the power back on. If the power is on and the switch still doesn’t work, turn off the power and remove the faceplate to inspect your wiring connections. Make sure each wire is attached to the correct terminal and that the connections are secure. Loose wires can prevent a switch from functioning properly.
Common Mistakes to Avoid
Skipping the voltage test. Turning off the wrong breaker is more common than most people expect. The only way to confirm the power is actually off is to test with a voltage tester. Never rely on flipping the switch alone or assuming the panel labels are accurate.
Misidentifying wires is a common mistake that can lead to an improper connection. Always label the wires when you disconnect them from the old switch, and double-check before connecting them to the new switch.
Wrapping wires counterclockwise. As covered in Step 4, counterclockwise wrapping means the screw pushes the wire away rather than pulling it tight. Always go clockwise.
Not checking the amperage rating. A 20A circuit needs a 20A switch. Putting a 15A switch on a 20A circuit is a code violation and a potential hazard. Check the back of the old switch and match the rating.
Leaving old backstab connections on the new switch. Backstab or push-in connectors are convenient but less reliable than terminal screws, especially in older wiring where the wire ends may be slightly corroded. When in doubt, use the screw terminals.
If you find aluminum wiring — silver-colored wire rather than copper — the metal part of the wires looks silvery rather than orange-gold. Aluminum wiring was common in homes built between 1965 and 1975, and improper connections with aluminum wiring can create fire hazards. This requires a CO/ALR rated switch and specific handling — do not proceed with a standard switch.
What to Do If Something Looks Wrong Inside the Box
Opening a switch box sometimes reveals things that weren’t expected. Here’s how to handle the most common surprises.
No ground wire. Some older homes have two-wire circuits with no ground. You can still replace the switch — connect the two hot wires to the brass screws and leave the green ground screw empty. The switch will work, but the grounding protection is absent. This is a pre-existing condition with the wiring, not something you created. Note it and consider upgrading the wiring or installing a GFCI circuit as a protective measure when budget allows.
A white wire with black tape or black markings. This is normal in switch leg wiring and means the white wire is being used as a hot conductor, not as neutral. Treat it exactly like a black wire. Connect it to a brass terminal screw.
The wires are too short to work with comfortably. If the wires barely reach the terminals and there’s no slack, do not pull on them. Very short wires in an old box indicate the original installer used the entire wire length. You can add pigtail extensions using wire nuts and short lengths of matching wire to give yourself working room — but if the wires look damaged or brittle at the insulation, this is a job for an electrician.
The box is packed with wire nuts and extra wires you don’t recognize. Disconnect only the wires going to the old switch. Leave everything else exactly as it is. If the box looks like it’s been modified multiple times and you can’t clearly identify which wires belong to the switch circuit, stop and call an electrician.
When to Call a Licensed Electrician
Most standard single-pole light switch replacements are genuinely within reach for a careful homeowner. But a few situations make professional help the right call.
Call an electrician if the wiring in the box looks damaged, burnt, or discolored. If you smell burning when you open the box, that’s a sign of a more serious problem than a worn switch. If your breaker keeps tripping after the new switch is installed, something else is happening in the circuit — read up on why a circuit breaker keeps tripping before resetting it repeatedly.
Call if you find aluminum wiring, as covered above. Call if you open the box and can’t identify which wires belong to which circuit. And call if you’re not comfortable at any point — there’s no shame in that, and a licensed electrician will complete the job in under an hour.
Electrical work in the US is governed by the National Electrical Code (NEC), the standard that defines safe wiring practices for residential and commercial buildings. Your local municipality may adopt additional requirements on top of the NEC, and any electrical work that requires a permit must be inspected to confirm compliance.
For a broader understanding of how residential electrical systems are structured — circuits, grounding, panel configurations — the Wikipedia article on home wiring is a useful reference that explains why each component exists and how they interact.
FAQ
Is replacing a light switch something a homeowner can legally do themselves?
In most US states, homeowners are permitted to do their own electrical work on their primary residence without a license. However, some jurisdictions require a permit for any electrical work, even minor repairs. Check with your local building department if you’re unsure. Permit or not, the work should meet NEC standards and your local code requirements.
What happens if I connect the wires to the wrong terminals?
For a single-pole switch, reversing the two hot wires simply means the switch operates in the opposite orientation — the light is on when the toggle is down and off when it’s up. It will still work and isn’t a safety hazard. However, leaving a wire loose or connecting the ground to a hot terminal is a different matter entirely and needs to be corrected before turning the power back on.
My new switch works but hums or buzzes slightly. Is that normal?
A very faint hum can occur with dimmer switches when the bulb load isn’t matched to the dimmer’s specifications. With a standard toggle switch, any hum or buzzing is not normal and usually means a loose connection or a switch rated incorrectly for the circuit. Turn the power off and check that all terminal screws are properly tightened. If the buzzing persists with correct wiring, replace the switch again — the unit itself may be defective.
Do I need to turn off the main breaker or just the circuit breaker?
Turning off the individual circuit breaker is sufficient, as long as you confirm with a voltage tester that the power is actually off at the switch box. The main breaker cuts power to the entire panel and is only necessary when you can’t identify the correct circuit breaker.
Can I replace a standard switch with a dimmer switch?
Yes, but there are compatibility requirements. The dimmer must be rated for the total wattage of the fixtures on the circuit, and LED bulbs need a dimmer specifically labeled as LED-compatible. Also, most dimmer switches require a neutral wire in the box — which older switch boxes sometimes don’t have. Check the dimmer’s installation guide before buying.
What does it mean if the new switch gets warm after a few minutes?
A switch that gets noticeably warm during normal use is being asked to carry more current than it’s rated for, or it has a loose connection generating resistance. Turn it off, check the amperage rating against the circuit breaker serving that room, and verify all terminal connections are tight. If the switch is correctly rated and the connections are solid and it still runs warm, the circuit may have an underlying issue worth having a professional inspect.
How do I know which breaker controls the switch I’m replacing?
The most reliable method is to plug a radio or lamp into an outlet in the same room, then flip breakers one by one until it goes off. For a ceiling light, have someone watch the light while you flip breakers. Once found, label the breaker correctly so you have accurate information the next time. In older homes with an unmarked panel, mapping every circuit in the house takes about an hour and is time well spent.